🚀 VPS Essentials for Cloud Deployment
🎯 Purpose
A Virtual Private Server (VPS) is a virtual machine sold as a service, providing developers with a dedicated, customizable environment to host their applications with full root access.
🌱 Origin
DigitalOcean was founded in 2011 by brothers Ben and Moisey Uretsky with the mission to simplify cloud infrastructure for developers, focusing on ease of use and a strong community.
🧠 Essentials - Key Concepts & Workflow
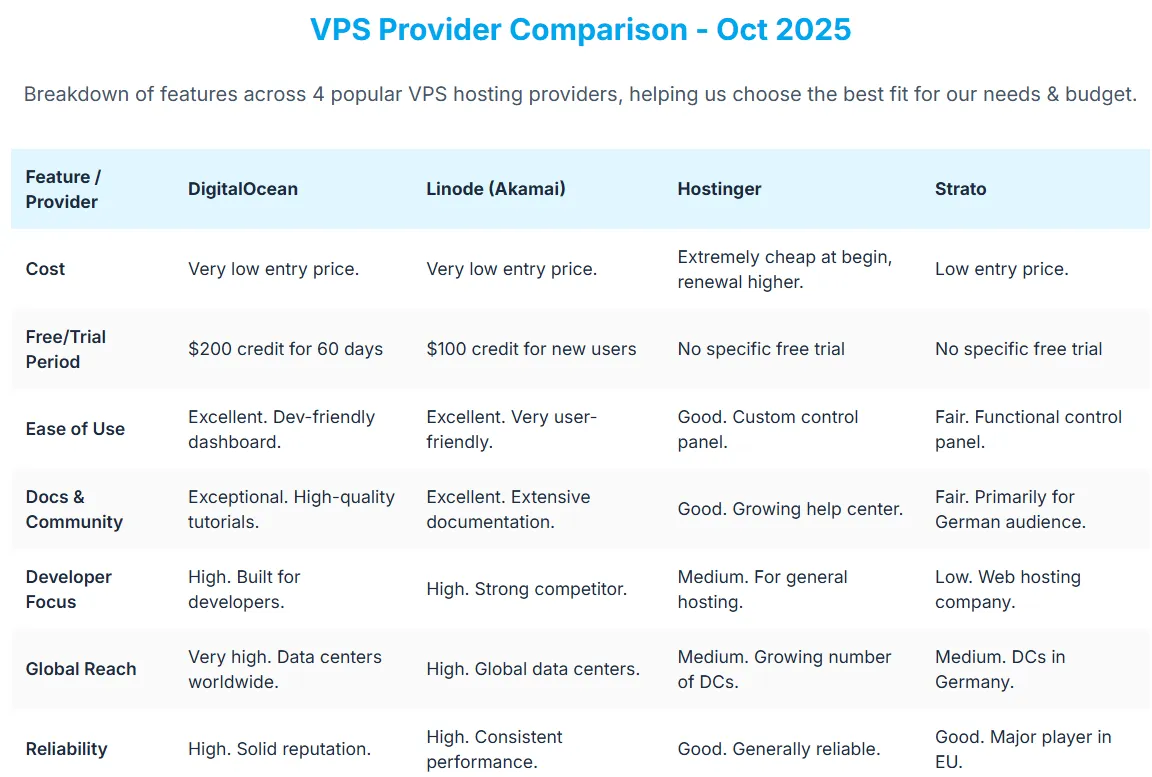
Cloud VPS Provider Comparison
VPS Instance
The “Droplet”: On DigitalOcean, a Droplet is your basic VPS instance. Creating one gives you a clean Linux server (e.g., Ubuntu) in minutes.
SSH Access
SSH (Secure Shell) Access: key-based authentication protocol for secure remote login. Securely connect to your server using SSH (ssh user@your_ip_address) to install software and manage your application.
-
Step 1: Generate an SSH Key Pair
ssh-keygen -t rsa -b 4096 -
Step 2: Copy your public key to the server
ssh-copy-id user@your_ip_address -
Step 3: Connect to your server
ssh user@your_ip_address -
Disable root login and use SSH key-based authentication.
-
Deployment:
git pullrepo from GitHub directly onto VPS server.
VPS Instance Setup
The Core Stack: You are responsible for the entire software stack. Our Setup
-
Runtime for your app (NVM/Node.js)
-
Database (MariaDB)
    # Install MariaDb
    sudo apt update; sudo apt install mariadb-server
    # Log in to mariadb shell
    sudo mariadb
    # Create and activate database
    CREATE DATABASE lucky_wheel_db;
    USE lucky_wheel_db;
    # Create table
    CREATE TABLE game_state (
        id INT AUTO_INCREMENT PRIMARY KEY,
        wins INT NOT NULL DEFAULT 0,
        losses INT NOT NULL DEFAULT 0,
        last_result VARCHAR(255)
    );
    # Verify table creation
    SHOW TABLES;
    DESCRIBE game_state;
    # Exit mariadb shell

    # add root password
    ALTER USER 'root'@'localhost' IDENTIFIED BY 'new_password';
    FLUSH PRIVILEGES;
    mariadb -u root -p

    # create and configure user
    CREATE USER 'your_user'@'localhost' IDENTIFIED BY 'your_password';
    GRANT ALL PRIVILEGES ON your_database.* TO 'your_user'@'localhost';
    FLUSH PRIVILEGES;
    # Remove insecure default settings
sudo mariadb-secure-installation- Webserver Nginx Setup
# 1. Install NginX
sudo apt update; sudo apt install nginx;
# Verify NginX is running. Status "active (running)"
sudo systemctl status nginx
2. Configure the Nginx Server Block in file `/etc/nginx/sites-available/wof`
server {
    listen 80;
    server_name [Instance_Ip];

    # Serve the static frontend files
    location / {
        root /var/www/wof; # contains Frontend files
        try_files $uri $uri/ /index.html; # pattern for single-page apps. Try to serve the requested file, then the directory, and finally falls back to index.html
    }

    # Reverse proxy backend API
    location /api {
        proxy_pass http://localhost:3000;
        proxy_set_header Host $host;
        proxy_set_header X-Real-IP $remote_addr;
        proxy_set_header X-Forwarded-For $proxy_add_x_forwarded_for;
        proxy_set_header X-Forwarded-Proto $scheme;
    }
}
# Copy frontend files to /var/www/wof
# Start Backend
3. Enable Nginx Config by by creating a symb link from sites-available to  sites-enabled dir
sudo ln -s /etc/nginx/sites-available/wof /etc/nginx/sites-enabled/
4. Test and Restart Nginx
sudo nginx -t # Test config for syntax errors
sudo systemctl restart nginx # restart to apply changes
5. Test remote browser connection: `http://[Instance_Ip]/` - Firewall for Basic Security: UFW (Uncomplicated Firewall) cmd to open ports for our web server (80, 443) and SSH (22).
    sudo apt install ufw
    sudo ufw default deny incoming
    sudo ufw default allow outgoing
    sudo ufw allow 'OpenSSH'
    sudo ufw allow 'Nginx Full'
    sudo ufw enable