🚀 Webserver Essentials for static serving & proxy-passing
🎯 Purpose
- A webserver delivers static web content (HTML, CSS, JS, Imgs) from server´s machine to client’s browser using HTTP/HTTPS.
- A Reverse Proxy (RP) sits in front of backends running of servers´machine and forwards client requests to them.
👉 Nginx and Apache can do both.
🌱 Origin
- Apache HTTP Server: Released in 1995 by the Apache Software Foundation; named from “a patchy server” due to its many patches.
- Nginx: Created in 2004 by Igor Sysoev in Russia to handle high concurrency and efficiency; name = “Engine X.”
🧠 Essentials
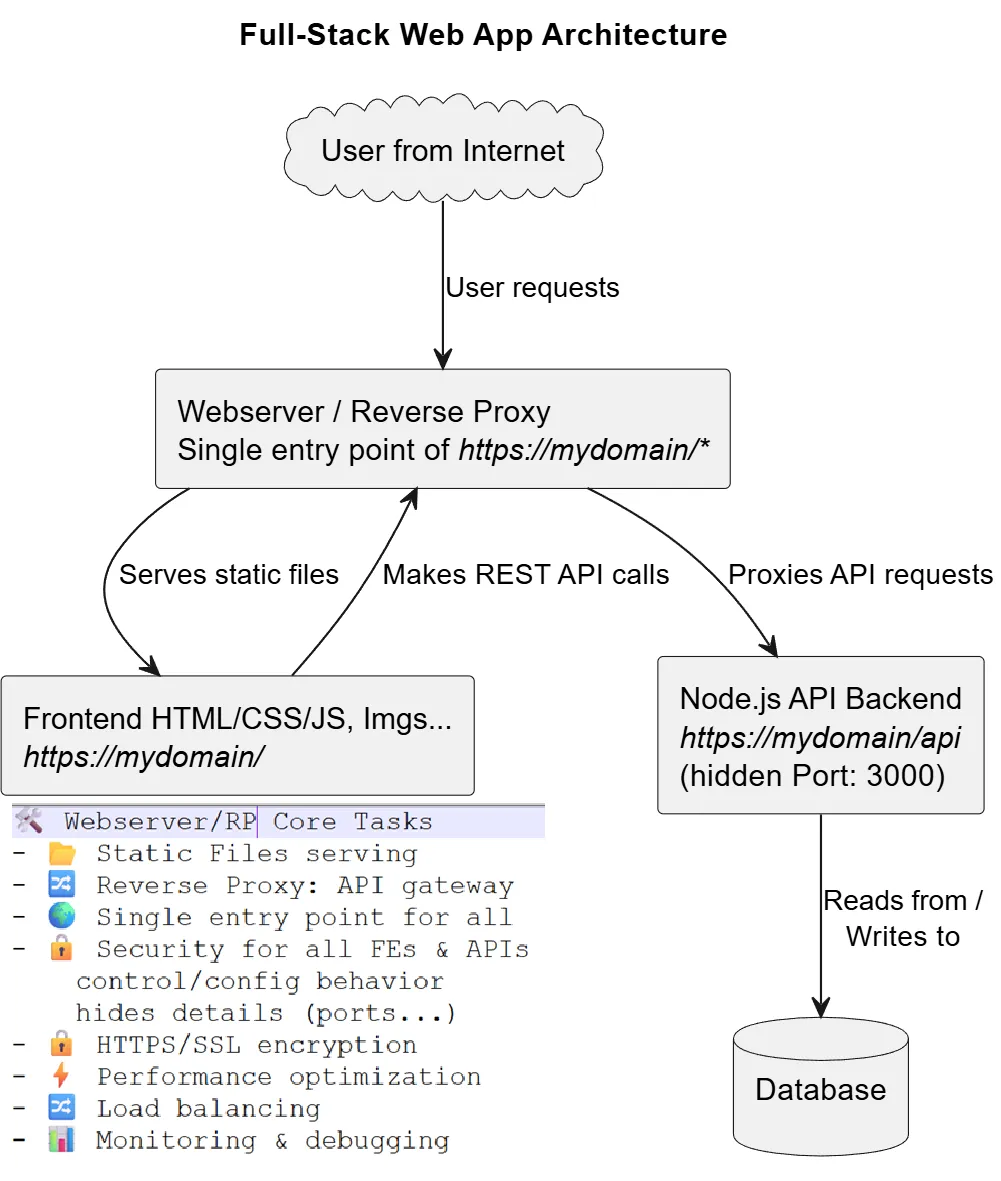
🛠️ Core Tasks of a Webserver
- 📂 Serve static files (HTML, CSS, JS, images).
- 🔒 Handle HTTPS/SSL encryption.
- ⚡ Optimize performance (cache static content, compress responses, offload SSL/TLS).
- 🔀 Load balancing: Distributes traffic across multiple backend servers.
- 📊 Log requests & errors for monitoring and debugging.
- 🔀 Forward requests to backend apps (reverse proxy).
- 🌍 Manage multiple sites/domains in one server (virtual hosts/server blocks).
- → ✅ Why do we need a RP?
- 🌍 Single entry point: One domain (e.g., https://wof.com) can serve both frontend (/) and backend (/api). Without it, you’d need different ports/domains.
- 🔧 Flexibility: Easy to swap or scale backend services without changing the frontend.
- 🔒 Security: Hides backend servers from the internet, only the RP is exposed.
- 👉 Without a RP, the frontend must know the exact address/port of the backend, you’d run into CORS issues, and managing multiple services becomes harder.
🔄 Host multiple sites on one server.
- In
ApachecalledVirtual Hostsand configured in config filehttpd-vhosts.conf<VirtualHost *:80> ServerName example.com DocumentRoot /var/www/example </VirtualHost> NginxcalledServer Blocksand configured in config file/etc/nginx/sites-available/[configname]server { server_name example.com; root /var/www/example; }
📂 Serving Static Files
- Copy static files to Webserver deployment Directory, to serve them to browsers
- In
Apacheconfigured in Virtual Host with:DocumentRoot "/opt/lampp/htdocs" - In
Nginxconfigured in Server Block with:root /var/www/html;
🔀 Reverse Proxy
- Configure Proxy-Passing to forward requests to backend apps (Node.js, Python…).
- In
Apacheconfigured in Virtual Host with:ProxyPreserveHost On ProxyPass /api http://localhost:3000/api ProxyPassReverse /api http://localhost:3000/api - In
Nginxconfigured in Server Block with:proxy_pass http://localhost:3000; proxy_set_header Host $host; proxy_set_header X-Real-IP $remote_addr; proxy_set_header X-Forwarded-For $proxy_add_x_forwarded_for; proxy_set_header X-Forwarded-Proto $scheme;
🔒 HTTPS / TLS Setup
Let’s Encrypt is a free & automated Certificate Authority (CA) that issues digital certificates to enable HTTPS on websites, making web encryption accessible to everyone.
- create certificate
# a. Install Certbot
sudo apt update
sudo apt install certbot python3-certbot-nginx # Nginx
# OR
sudo apt install certbot python3-certbot-apache # Apache
# b. Request a Let´s Encrypt Certificate
sudo certbot --nginx -d example.com -d www.example.com # Nginx
# OR
sudo certbot --apache -d example.com -d www.example.com # Apache
# 👉 Certbot: Obtains Let’s Encrypt certificate; Updates server config to use HTTPS and Reloads webserver.
# c. Test Automatic Renewal - certs are valid for 90days with auto-renewal
sudo certbot renew --dry-run- Configure webserver to use SSL certs
-
Apache
<VirtualHost *:443> ServerName example.com ServerAlias www.example.com SSLEngine on SSLCertificateFile /etc/letsencrypt/live/example.com/fullchain.pem SSLCertificateKeyFile /etc/letsencrypt/live/example.com/privkey.pem </VirtualHost> <VirtualHost *:80> ServerName example.com ServerAlias www.example.com Redirect permanent / https://example.com/ </VirtualHost> -
Nginx
server { listen 443 ssl; ssl_certificate /etc/letsencrypt/live/example.com/fullchain.pem; ssl_certificate_key /etc/letsencrypt/live/example.com/privkey.pem; } server { listen 80; server_name example.com www.example.com; return 301 https://$host$request_uri; }
- Verify in Browser Open https://example.com → should show a padlock 🔒.
⚡ Performance Basics
- Enable caching (static assets).
- Use compression (gzip, Brotli).
- Prefer Nginx for high concurrency; Apache for flexibility & .htaccess.
📦 Apache deployment (Frontend & Backend)
- Make
→ FE UI available onhttp://localhost/
→ BE API available onhttp://localhost/api/
- Enable virtual hosts extra config file
# Open file /opt/lampp/etc/httpd.conf
# Comment in following line (remove # at start)
Include etc/extra/httpd-vhosts.conf- Configure Apache Virtual Host
sudo nano /opt/lampp/etc/extra/httpd-vhosts.conf
#Add a VirtualHost with proxy rules
<VirtualHost *:80>
ServerName localhost
# Serve static FE files in htdocs/wof directly at http://localhost
DocumentRoot "/opt/lampp/htdocs/wof"
<Directory "/opt/lampp/htdocs/wof">
Require all granted
AllowOverride All
</Directory>
# Forward /api requests to Node.js backend on port 3000
  ProxyPreserveHost On
  ProxyPass /api http://localhost:3000/api
  ProxyPassReverse /api http://localhost:3000/api
</VirtualHost>-
Copy frontend static files to DocumentRoot
-
Restart Apache
# Open XAMPP GUI
sudo /opt/lampp/manager-linux-x64.run
Start/Restart Apache- Fix URLs in FE code
API_URL = 'http://localhost/api'🌍 Internet access to web app running on local dev env
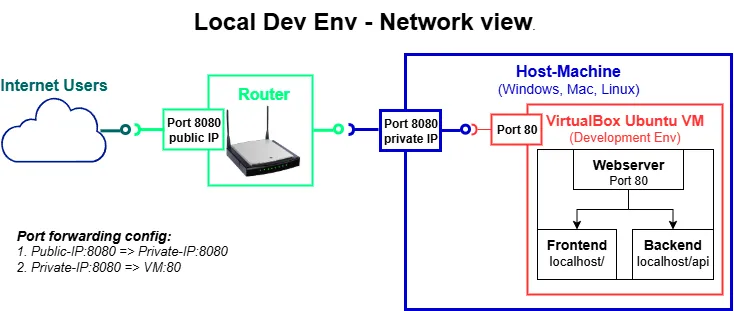
Goal: access FE UI over the internet using http://[public-ip:8080/]
-
Fix API_URL in FE to be ‘/api’ (local is always the adr of the caller)
-
Configure following Port forwarding in virtual box:
→ [host-private-ip:8080] → [vm-ip:80]
→ host-private-ip can be found by running cmdipconfig /allon Host-Machine -
Configure following Port forwarding in router admin panel:
→ connect to router admin panel and find Port Forwarding section
→ Add & save new rule [router-public-ip:8080] → [host-private-ip:8080] -
Test internet access to frontend
→ Use mobile devive not connected to same network as host-machine
→ Open http://[public-ip:8080/] in browser and play game -
Delete Port Forwarding configs after test (security)